Pages

Monday, December 30, 2013

Tiered Maxi Skirt Pants Tutorial

Hello! This is Harmony from 3Giraffes back to show you how to make an awesome pair of pants that look like a tiered maxi skirt for kids.

Why would you want to do this, you ask!? Wellllllll if your child is anything like my children, they have yet to figure out that skirts are supposed to stay DOWN. And that hanging upside down, or sticking your leg in the air are unacceptable things to do while wearing a skirt. I've had this idea kicking around in my head for a while and finally decided to just jump in, figure it out, and make something that I hoped my girls would love and want to wear.

The first pair I made turned out pretty cute, but I could see where I could improve on them. So of course I HAD to make another pair the next night. hehehehe I love the way the second pair turned out even more than the first pair. They are perfect!!

For the technique/instructions that follow I would suggest not going above a size 6. At the end*** of the post I will say my thoughts about larger sizes in this style and how I think it would work out best.

First you need your favorite pants pattern. *MY* personal favorite is Jocole's Essential Pants. But I'm sure the other pants patterns would work just as well for this. (Everyday Ruffle Knit, Flounce Ruffle, Mega Ruffle, maybe even the Skinny Minnie)

All of the actual measurements that I'm posting are for the size 4 pants and include a 3/8" seam allowance. I am including instructions on how to get those measurements so that the same technique can be used for ANY size pants.

Use the pattern for whatever size pants you would normally make. Measure down about an inch below the crotch and go straight across from there. It's like cutting out super daisy dukes. But don't worry! It will eventually be a pair of pants! You could either do what I do and just fold up the pattern so it's all hiding underneath, or you could cut it off and tape it back together. It's up to you!

Micro Daisy Dukes compared to the entire pants pattern. The pink lines are on the size 4.

Next measure from your 1" below the crotch measurement to the hemline. In the case of the size 4 it's 15 3/4" to where the actual hem should end. I use this measurement because I wanted to do a serged finish on this instead of folding under for a 1" hem. BUT even if you want to do a 1" folded under hem you should still remove that 1" from this measurement for your pants at this time. It will be added back in later. (I promise it will make sense as to why later!)

Take this measurement (in the case of the size 4 - 15 3/4") and divide in half (7 7/8").
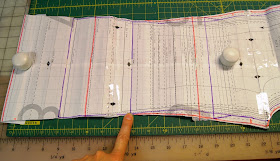
Halfway point between the bottom hemline and the 1" under the crotch markings.
Then add for seam allowance (3/8") x2 (1 5/8") for the top tier piece (total of 9.5").  This is how high your first tier will be. If you want to do just a serged bottom for the second tier then this is also how high your second tier will be. If you want to do a 1" folded under hem then this is when you add 1" to the measurement for the second tier only. Next you need to measure how wide your first tier should be.

Lay out your micro daisy duke pieces, overlapping the seam width at the side seam (if there is one depending on which pattern you use). Measure how long the bottom is. (For the size 4 it's 17.25".)
Front and back cut out super short daisy dukes.
For the first tier you want to have a piece that is your first measurement from the steps just above (for the size 4 it's 9.5") x 1.5 times the width of the bottom of the shorts. So for the first tier for a pair of size 4 pants you need a piece that is 9.5" x 25.5". (The 25.5" is because the bottom of the shorts would measure 17.25". Take this, divide in half and you have 8.63"...I rounded it down to 8.25" to make measurements even. I like easy numbers...and lets face it a fraction of an inch" isn't going to make this ruffle that much rufflier. Add 17.25" and 8.25" and you have 25.5".)

For the second tier you need to use your height measurement (either including or excluding a hem allowance) x 1.5 times the width of the first tier. So for me it was 9.5" x 38.25".

Sew the micro daisy dukes as if you are going to make them shorts as-is. Right sides together, center front. Right sides together, center back. Open both front and back and put them right sides together and sew the sides. Do NOT sew up the crotch/inseam yet!!

Mark the center points of each of your tier strips and gather them all using whatever gathering method you prefer. Right sides together pin one of the gathered first tiers to one leg, matching up your marked center to your side seam (if there is one). Do the same thing with the first tier to the second leg. Sew these together. Mark the center of the bottom of the first tier and pin the right sides of the second tier to the first leg matching up the center points. Do the same thing with the second leg. Sew tier 1 and tier 2 together.

Now sew up the entire inseam starting at the bottom of one leg, all the way up, to the crotch, and back down the other leg. Turn right side out and hem however you have chosen to. Attach elastic.

And voila! Pretty awesome maxi skirt pants!! YAY!
Looks like a skirt with the legs together, right!?
The hardest part is the math for it all. And really, as long as you have a good guestimating mind or a calculator that's not even hard to do! It's all addition and division.
Shirt was made using the Easy Cap Sleeve shirt pattern and altering it. But that tutorial is for another day! :)

***Thoughts on doing sizes larger than a 6: Starting at a size 6 or 7 and up to a girls size 12 or 14 there should be four or more separate sections. The first section would be the micro daisy dukes and then three or more tiers. This is more for aesthetic reasons because the point of these pants is to get the full maxi skirt look. Since the kiddos are taller/bigger it needs to be fuller at the bottom to achieve this. You would do the calculations in the same manner, but the height of each tier would be based on dividing the leg portion by 3 or 4 (depending if you have 3 tiers or 4 tiers) instead of 2. You would continue to do the length of each tier as 1.5x the length of the piece above it for a beautiful full skirt look.

Jodi, thank you for letting me come play over here again!! It was fun!

Friday, December 27, 2013

Sewing Tools You Need: Electric Seam Ripper

 Electric Seam Ripper


Sewing Tools You Need: The Electric Seam Ripper ... I saw one showcased at a quilting expo ... and I instantly fell in love and knew I just HAD to have it.

ok ok ... technically it's for trimming hair ... but NOPE, in my mind it will be forever known as an Electric Seam Ripper.

I used to dread sewing a mistake and then having to rip out the stitches ... but now I actually don't mind it, not one little small tiny bit.  Sometimes I up sewing something just so I can rip it out, it's FUN!!


Remove stitches quickly and easily with the battery operated seam ripper.  Small enough to fit in the palm of your hand and it only requires one AA battery.  Small enough to store with all your other sewing tools.

I paid twice as much at the quilting expo ... and then I came home and found the EXACT same model on amazon for half the price (and FREE shipping!!)  I'm sharing that good news with you.

you NEEEEED one ... for realz ...

Go buy one ... and then tell me all about what you think.

 Electric Seam Ripper


*** Disclosure: This post contains affiliate links.  When you purchase any items through those links I earn a percentage of the sale.  Thank you so much for your support!  I appreciate you!

Sunday, December 22, 2013

Pajama Sew Along: Day 5

Today, we are going to work on the inseam and crotch seam on the ruffle leggings and  the crotch seam and elastic waist for the mega ruffles.

For the ruffle leggings/cuffed pants:

We left stopped after attaching the ruffles yesterday. We will pick up on step 8.

Place your pants right sides together and sew the inseam, making sure your ruffles (if you have them) are lined up. press and steam the seam and topstitch if desired.

For both leggings and mega ruffles:
Next, we will turn one leg right side out and put it inside the other, lining up the seams and raw edges.

Now we will sew that seam, making sure to stretch it a bit (for the leggings) and backstitch to reinforce it. Press, steam, and topstitch if desired.

For the Mega Ruffles/Boy pants:
Flip your waistband allowance back down and you should have something like this:

Now, we will topstitch 1/8" from the fold and again 1" from the fold. Leave a 2" gap for inserting your elastic!

Now insert your elastic using a safety pin or bobkin, making sure not to twist it! Sew the two ends together with a tight zigzag. stretch the elastic to distribute evenly, then sew the opening closed!

See you tomorrow to finish up the pants! I can't wait to share mine with you all!

Larissa

Tuesday, December 17, 2013

Pajama Sew Aong: Day 4

Welcome back! Today, we are going to start our pants! Here is the breakdown of steps for the different pants:

Ruffle/cuffed leggings: Steps 1-7
Mega ruffles/boy's pants: Steps 1-10

First, lets tackle the ruffle/cuffed leggings! Here are what your pieces should look like:

If you are doing the ruffle option, you will create your hem's first. Jodi gives some great tips on creating a faux cover stitch or using a zigzag. If you are adding cuffs, skip the hemming. 

Next, ruffle those ruffles! Again, Jody shoes you a great way to gather the ruffles with elastic, or you can gather by hand.
 Attach the ruffles to the hem, adding however many you would like. 

Now, if you are adding a cuff, follow the great add-on instructions (Cuff add on) to create the cuff to sew on later!
Now, for the Mega Ruffles/boys pants!
Here is what your pieces will look like: (boys on the left, ruffles on the right)
For the ruffle pants (both with and without the ruffle) you are going to add the pockets now (totally optional).
Then make sure you have the correct pieces and place them right sides together. Sew both side seams, press and topstitch, if desired.
 Now you will seam finish the top of the waistband and fold the waistband down. DO NOT SEW.
 Now, pin and stitch the inseam. Seam finish the raw edges.
See you tomorrow  to work on that waistband!
Larissa

Friday, December 13, 2013

Lengthening the Mega Ruffles to Straight Pants

FREE tutorial on how to modify the Mega Ruffle Pants pattern from Jocole to eliminate the ruffe and turn them into straight leg pants.

This is how I modify the pattern to use for my son (he's not a fan of ruffles).

Materials Needed:
Mega Ruffle Pants -- pdf sewing pattern
pencil or pen
ruler
scissors
paper and tape

Suggested Fabrics:
Lightweight woven fabrics like quilting cottons, flannel, batiste, lawn, broadcloth, linen, chambray, poplin, seersucker, lightweight suiting fabrics, lightweight denim, twill, lightweight corduroy
*** Alternative Fabrics: Consider making your Mega Ruffle Pants out of knit fabrics like: jersey, interlock or rib knit.


Cutting Instructions:
Makes sure you cut your pieces so that you have 2 opposite front leg pieces and 2 opposite back legs pieces.

The following picture is shown on a size 5, the blue lines are the original pattern lines, the RED lines are the newer pattern adjustment lines.

Sewing Instructions:
Compete Steps 1 through 21 shown exactly like in the pdf pattern.

Skip steps 22 through 33 (the ruffle instructions).  Instead press up the hem 3/4" and topstitch it in place.

Pajama Sew Along: Day 3

Welcome back! Today, we will finish up our shirts! These are Steps 24 through 27.

So, we left off yesterday with attaching the sleeve ruffles or preparing your cuffs. Now, if you are adding a ruffle around the neck, this would be the time! My girl asked for no ruffle (so no picture of a neck ruffle!)

Next, we are going to line up the side seams. Pin in place and sew from the sleeve cuff, up the arm, and down the side seam.

Next we are going to hem the bottom of our shirt. Fold it up and pin (if needed, I pressed mine with a hot iron and it was fine). I LOVE the tip in the pattern about placing the hem under the machine, then putting a post-it note pad next to the hem and then flipping it over to sew it! I also love hemming something flat rather than in the round!

Now, we can line up that last side seam and sew it! If you did a ruffled version, then you are done! Turn it right side out and give it a steaming if needed!

If you are adding cuffs, we are going to turn our shirt right side out and mark it into quarters, the same as we did with the cuff pieces last night. now, we are going to slip the sleeve into the cuff (right sides together), matching up the raw edges.

Line up the pins and sew, stretching the cuff to fit (don't over-stretch!). if you are not using a serger, seam finish that edge!

We did it! We finished our shirt!!!

Join us tomorrow as we start the pants!

Larissa

Thursday, December 12, 2013

Pajama Sew Along: Day 2


Sew a long day 2! Steps 13-23

Today we are creating our ruffle sleeves or preparing our cuff pieces to sew on at the end.

If you are creating the cuffs, you are going to skip to step 16.

First, gather your supplies for today (shirt, sleeve pieces, and either your ruffle strips or cuff pieces).

Now, for those creating ruffles, hem those sleeves, making sure to stretch while stitching! There are great tips on using a twin needle to create a faux coverstitch, otherwise you can use a zigzag stitch.

Time to get our ruffle on! There are great tips of ruffling with clear elastic (I always forget to pick some up!) or you can ruffle by hand.

Now, attach that ruffle using a zigzag stitch. Repeat with however many ruffles you want to add! My girl is 11 and requested no more than 1 ruffle on the sleeves!

Now we are going to attach the sleeves to the shoulder. **Remember to take your time here and pin, pin, pin!**

Now sew it on, gently stretching as you sew (if not using a serger).

If you are adding cuffs to your sleeve, you will want to follow the instructions (cuff add on) to create the cuff. We will not be sewing  them on until tomorrow, but have it ready!


See you all tomorrow, when we will finish our shirts!

Wednesday, December 11, 2013

Pajama Sew Along: Day 1


  • Hi! I'm Larissa, a Stay at home mom to two wonderful kids and owner of Ellie's Trunk. You probably see me in a lot of designers sewing groups and the big PDF group quite often. My oldest, Jody, just turned 11. She is my little fashionista. The baby is 6 months old. That's right, they are 10 1/2 years apart!

  • When I was a child, Christmas always meant three things. First, lots of goodies to eat. Second, we would be seeing family that we rarely got to see. Third, we would get a new pajama set. We always opened them first, then ran to change into them, claim our spot on the floor and open presents! Now, my family opens presents on Christmas Morning, but I still wanted to carry on the tradition of pajamas on Christmas Eve. Usually, they are store bought and reflect the interest of my daughter that year. Well, I have been sewing for just over 2 years now, and decided that this year would be momma made jammies! I am still trying to convince myself that I will be able to complete jammies for both kids, pajama pants for both myself and the husband, and sew up Christmas Day outfits for both kids. Christmas is 2 weeks away....I can't seem to get anything done unless I have a deadline these days. When Jodi contacted me about running a sew a long for her, and then said she wanted to do pajamas, I was sold! Get some Holiday sewing done, and a deadline to meet!

If you have any questions the Jocole FB group is a great place to ask them!

On to the sewing !!  Today we're working on the Shirt ... Steps 1 through 12.

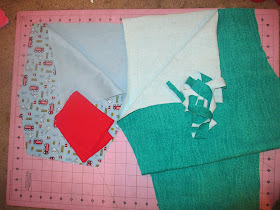
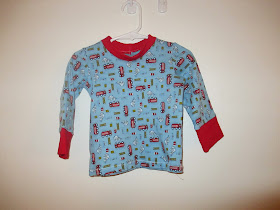
By now, you should have all your pieces cut out  (the picture is for the cuffed version) ... neckband, sleeve, sleeve cuff, front and back

[Steps 1 - 4]  Place the front and back right sides together and sew the shoulder seams -- be sure to stretch it a bit while sewing if you aren't using a serger.  Topstitch if desired!  (Oops, I forgot to snap a picture of that step!)

[Steps 5 - 9]  Next, take your neckband piece and sew it into a loop!  Fold it in half and mark it into quarters.  Do the same for the neckline of the shirt.

  • [Steps 10 - 12]  Now we'll them together, matching the pins.  Remember to stretch it just a bit while sewing if you aren't using a serger.

Join us tomorrow when we will construct our sleeve, and either hem or add the cuff pieces.